Thursday, November 4, 2010

Day of Gratitude

This time of year always reminds me of falling leaves of beautiful reds, golds, and oranges.  One of the things I miss living in Florida.  So I made this card using a technique called Joseph's Coat.  I'm sharing it with my library groups this month.  The stamp set for the leaves is called Autumn Splendor and the saying is from a new set called Day of Gratitude. 

As I looked at the other stamps in the Day of Gratitude set, I thought they would work perfectly for a stained glass technique.  Paired with the Autumn Spice Designer Series Paper (I L-O-V-E this paper!!), I made a cute little tea light for my Thanksgiving table.  This one is just my prototype because I wanted to see how it worked before I made a bunch of them.  What do you think?  Maybe I'll use one of our border punches to finish the top.  OR, I could make it upside down and place them over a string of white lights and then I have no need for the candles!  Yeah! 

Saturday, October 16, 2010

Apple Cinnamon Biscuit-Muffins

I just couldn't resist sharing these delectable treats with you.  It was so nice and cool out this morning...perfect weather for making Apple Cinnamon Biscuit-Muffins.  They're called that because I use canned biscuits to make them.  Granny Smith apples, golden raisins, cinnamon, sugar, butter and Honey Butter Grands biscuits.  I would like them with walnuts, but my guys don't like nuts.    Want the  recipe?   Send me your email address and I will be happy to share it with you. 

I wonder why they call it "One Sheet Wonder"?

It's been a while since I taught a class using this pattern, but I really enjoyed making the projects to show.  I made a few modifications from the original style of this technique.  I used to pre-stamp an entire sheet of 8 1/2 X 11 cardstock, then cut it apart, but this time, I cut first, then stamped each piece.  I think I like this way better.  It took me about 2 hours to completely create and assemble all 15 projects, but I had so much fun.  I shared this technique with my library group, giving each attendee a printed pattern and some ideas for completing the individual projects. 

My second One Sheet Wonder project uses a different color scheme and stamp set, but basically, the same pieces.  To the 8 1/2 X 11 sheet of cardstock, I added 2 sheets of 12x12 textured cardstock, a few embellishments and a lot of fun. 


I made this little baby card for my friend, Lisa.  She just became a grandmother for the first time.  Always an exciting event.  It's a blend of old and new:  a retired wheel was used to make the laundry line of clothes and the texture of the card front was made using the Square Lattice embossing folder and Big Shot.  Over the "laundry", I glued a 'previously utilized' dryer sheet for a baby-soft effect.  A trick I learned from a gal in my downline.  Thanks, Dottie!   Congrats to the parents and family of little E.J.  Babies are always such a blessing.....

And speaking of babies, here are two of my adorable grandchildren, 5 year old Noah and 1 year old Kailey.  They went to a country pumpkin patch with Mommy and Daddy who shared some wonderful photos of the whole experience.  Look at those faces.  Aren't they just the sweetest? 

Thursday, October 14, 2010

How does my garden grow???

So, I've been asked about my garden.  I posted details a couple of weeks ago about how I purchased an AeroGarden and planted some herbs.  After 2 weeks almost all of the herbs have sprouted and are growing well, except the purple basil. 

The Italian Basil is doing extremely well.  A few more days and I can harvest some of the larger leaves.  Just in time for sauce on Sunday?

The chives are getting taller and since I took this picture, one of the seed pods finally fell off.   They are also nearly ready to begin the first 'harvest' or trimming.  Baked potatoes with sour cream and chives!

The dill is going wild!  As you can see, it tried to attack the camera during shooting.  Baked fish with butter and dill? 

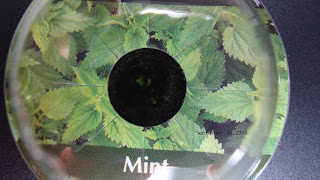
The mint is lovely.  Also beginning to get fragrant.  I don't like mint juleps, so perhaps some mint tea. 

The thyme was the first to sprout and is growing very well.  This is ready to pick now.  I need to take off some of the top leaves to allow the smaller ones to get some light.  Thyme is good in so many things.

....and then there's the purple basil.  I took the dome off for a peek inside.  I don't see anything in there but mud.  Don't think this one is going to be productive.  But I will be patient. 
So that's my 2 week update.  It's really fun to watch the progress each morning.  Check back later to see how my garden is growing.  Who knows?  I may have a green thumb after all.  Thanks for visiting my blog.  Have a great day! 


Sandy.

Thursday, October 7, 2010

Happy Birthday to all our October babies...and a few in late September

This is the card I sent to my sister, Linda.  I won't tell you how old she is, but she's 2 1/2 years younger than me.  Needless to say, we spent a lot of time together growing up.  Oh, the stories we could tell you.  Happy Birthday, Little Sis.

Not a birthday card, but I sent this card to all my friends and relatives who have fought breast cancer.  All very strong women, so the verse inside is a quote from Eleanor Roosevelt, "A woman is like a tea bag.  You never know how strong she is until she gets in hot water."  Breast cancer is some pretty hot water, but kudos for all of those who have fought and survived! 

My sweet niece, Rebecca loves coming to Florida and visiting the beach, so I couldn't resist sending this cute little "gel" card.  Yes, that's a little bag filled with blue hair gel in front of the starfish to give it that "watery" look.  The sand on the front is from our local beach.  I ran down to the beach one morning, scooped up a little container of sand which also had all those tiny shells and pieces of shells in it.  "Snappy Birthday, Becca!" 

I host a library group each month and it's fun to come up with new projects.  However, at my group, I teach them a new technique each month and they have to design their own projects.  Recently, I subbed for a friend who has a group at another library.  She designs the projects and provides EVERYTHING for them to make all the projects.  Anyway, these are the 3 projects I did for her group.  They all seemed to like the variety of techniques and projects.   I had fun and hope to visit with them again soon.   Thanks to the ladies at the Palm Bay library!  By the way, some of us did eat some of that candy corn.  Who could resist??  I love that stuff and it's healthy....made from honey.  :-)
 . 

Thursday, September 30, 2010

My new garden....

Last weekend I went to Sears with my grandson, TJ.  We picked out an awesome new mattress/box spring set for him.  After concluding our purchase, we were browsing through the store and I found an AeroGarden on the clearance rack.  Well, while I was visiting Denver a couple of years ago, one of the restaurants had all these wonderful herbs and greens growing in AeroGardens in the window.  I was amazed and in awe.  See, I do not have a green thumb.  Every plant I bring home, my husband just calls the "next victim".  Seriously, I even killed the silk plants! 
But I saw this AeroGarden with it's little box of herb seeds and it said all I had to do was add water.  How hard can it be, right?  So I bought my AeroGarden and carted it home with visions of lush green vegetation growing in it within a matter of weeks. I was so excited!  So much so that I couldn't sleep.  On Sunday morning, I got up around 4:00 a.m., read the instructions as I assembled the AeroGarden and 'planted' my herbs of basil, thyme, dill, parsley, purple basil, mint and chives.  I added the correct amount of water and nutrients just like it said in the booklet, I popped in the little pots of seeds and covered them with their tiny little bio-domes and I wait. 

On day 3, I see the tiniest little sprouts of Thyme!  I am absolutely thrilled beyond belief.  Something is actually growing in there!!!  Ecstasy! 

On day 4, there is a basil plant emerging!  I jump for joy!  Basil!!!  I quickly texted my husband.  His smartass reply:  "It's time to make sauce!" 


Today is day 5.  The Thyme is now officially peeking out over the top of the little container.  There are several little seedlings now, all clamoring for freedom.  The Basil plant has a pair of leaves and has nearly reached the top of the pot.  Maybe by bedtime tonight.  Close examination has revealed a Chive plant has sprung from it's little seed and is trying to make it's way up toward the light.  There are also little tiny green specks (could they be little leaves) showing in the soil of the Mint pot.    And maybe the dill is starting to sprout!!  I will keep you posted as they grow.  Now I know how Jack felt when that beanstalk sprouted! 

Sunday, September 12, 2010

Ooh, La La! French Foliage and Letterpress are tres jolie!


The new letterpress plates are so easy to use and make great projects.  Now, you're supposed to ink up the plate using craft ink, but you know I have to make up my own rules as I go, sooooo......   I ran Sahara Sand cardstock through the Big Shot using the Lots of Love letterpress plate (120983 for $7.95), then used Crumb Cake ink to gently brayer over the resulting image.  I then used the Bigz Top Note Die to cut out the image attached to the front of the card.  And don't you love the little pearls on the heart?  (119247, $4.95 for 150 of them!) 
Ooh, la la!  I think French Foliage (121166 clear for $14.95) is one of my new favorites from the Holiday Mini Catalog this year.  I added the element of "vintage" by using the new Distressing Essentials Kit (118762), but the fun part was creating a shimmering effect by mixing equal parts of Champagne Mist shimmer paint (116806) and Classic ink refills like More Mustard, Pumpkin Pie and Soft Suede.  The mixtures were painted onto the stamps using a watercolor brush, then stamped onto Very Vanilla cardstock.  See close up image below for detail.   I then used the Tea Stain ink spot to drag across the cardstock and to accent the torn edges.  And isn't the Victoria Lace (118481 $6.95) so pretty?   Of course, I had to use one of the new Antique Brads (117273 $5.95) to attach a saying from Just Believe (120453 clear $25.95).  Everything was then attached to a Cajun Crazy cardstock that had been stamped with Cajun Crazy ink and En Francais background stamp.  All in all, I think it turned out rather well.  I have a special someone to send it to, so we'll see how she likes it. 


Here's a close-up to try to show the shimmer effect of the paint mixtures.  It really doesn't do it justice, but this is such a fun technique that you really should try. 

That's my post for today.  I'm still trying to get all my stuff moved into their proper places, but my craft room is now useable and I just couldn't resist spending some time with my stamps today.  I hope you enjoyed the projects I created. 

                                                                                          Creatively yours,
                                                                                                               ~Sandy~

Monday, September 6, 2010

Miss me?

I just realized that I haven't posted anything for a while.  Well, life has been super busy (isn't it always?) and I just haven't taken the time to catch up.  In case you're wondering, I decided to make several changes in my life.  I accepted a new position and I'm very excited about it, so that has had the majority of my attention lately.  I quit my part-time job and although I will miss my co-workers, I do enjoy the feeling of less stress. 
I also decided that since I will be working from home now, I needed a more comfortable work atmosphere where I can focus on my work.  Thus, I decided to switch my craft room and my current office spaces.  Now if you have ever seen either of these spaces you must be thinking, "What?  What is she thinking?"  or as my husband said, "Impossible!  It can't be done!" 

So, with that said, I started to pack up all my craft supplies - a daunting and sometimes overwhelming task - and empty the contents of the new office into my dining room.  I moved 2 of my larger bookcases into the small soon-to-be craft room and filled them with necessary stamping supplies.  The smaller bookcase will hold other supplies and magazines and the tiny closet contains my scrapbooking supplies.  Now, at this point, I think I should mention that the small space is only 7'X7' and the closet is actually tiny - only 19 inches wide and 24 inches deep - but perfect for shelves of 12x12 papers and supplies. 

The new office is being painted by my beloved nephew.  My husband nearly freaked when he saw the color (can you guess what it is?) but I love it.  Unfortunately, I will have to move everything out again when the new flooring is installed, but that will be the easy part.  I have a huge computer desk that takes up most of the wall in the small room that must be moved to the new office.  The hard part will be getting it OUT of the small space and INTO the larger space.  I love my house, but there is an angled hallway between these two rooms. 

As I plan to utilize the vertical space in my new craft space, I have decided it would be a moot point to paint the walls there, so I will just leave them the pale blue-- for now.  I may change my mind later.  Probably.  But the flooring in there will also be replaced, so I have a few days to decide.  Either way, I'm very excited about my tiny new craft space.  I know that sounds ridiculous, but downsizing my space will force me to get organized and stay organized and hopefully prevent me from hoarding unnecessary supplies, as I have done for years. 

Now for the really difficult part:  I have to get rid of a LOT of stuff!  I am currently storing as much as possible until our neighborhood garage sale in February, but I will be hosting an inventory clearance sale once my rooms are done.  I didn't take "before" pictures, but I will post the "after" pictures when the rooms are complete.  Check back later for the results.  My targeted completion date is October 10th.  I'll let you know how it goes. 

Happiness to you!

Sandy

Friday, August 6, 2010

13% off 13 items for Friday, the 13th!

Get 13% off any of the 13 items on pages 23-27 of the Idea Book and Catalog on Friday, the 13th of August. Contact me by phone or email for an instant discount or order online and receive a 13% rebate*.   If you don't have an Idea Book and Catalog, contact me NOW! So many great ideas are packed into this book and you can get one for FREE when you host a workshop or place a minimum $50 order.  Halloween is just around the corner, so let's get started planning your tricks and treats. 

Don't want to wait until the 13th?  Place your order now and I will hold it until the 13th, but the final order will be submitted at midnight on August 13th.

Call or email me today!!    Get 13% off these 13 items.  Have a lucky Friday the 13th.

*rebate is payable from demonstrator within 5 business days after your order is shipped. Stampin' Up! is not responsible for any rebates or discounts offered by individual demonstrators.

Sunday, July 25, 2010

Happy Labor Day! It's a girl!

One year, on my daughter's birthday, she sent me a nice gift basket.  The card attached read, "Happy Labor Day!  It's a girl!"  Her clever idea has become a bit of a tradition and I love her ingenuity.  This year was no exception.  We took in a movie, then had a nice lunch together.  Afterward, she presented me with this very colorful bouquet.  It's her of way of recognizing me for bringing her into the world and it's why she always holds a special place in my heart. Thank you, Susie. Happy Birthday!

Saturday, July 24, 2010

For anyone who has ever wondered why I love going to Stampin' Up! events like our annual conventions, Leadership conferences and Regional seminars, etc., take a look at the excitement in these pictures.  Imagine a convention hall filled with thousands of men and women who all share the same passion for stamping.  It's truly an amazing experience.  Wouldn't you love to be a part of this crowd???  Join my team and let's go together! All lined up and waiting for the doors to open so the festivities can begin.  Make and takes are such a fun part of the Stampin' Up! experience.  This is only one of several make & take sessions during convention.  Main stage.  Now those are some BIG stamps.  Thanks to all who shared their photos this year.  I made it to Leadership in Phoenix this year and plan to attend in Nashville in 2011, then convention in Salt Lake City.  All are great experiences, but always better shared with friends.  Start making plans now to go next year.  I am.

How sweet is this face?

I just had to share this picture of my beautiful granddaughter, Kailey who just celebrated her first birthday last month.  Not only is she adorable, but she has the sweetest personality and the best little giggle ever.   Her big brother, Noah is our superhero - always full of fun and energy.

Sentimental Journey

This was the swap card I made for our stamp club.  The theme was anything travel-related.  Several of the ladies in our group travel quite extensively and have been away during the summer, so this was a good time to see how travel inspired their creativity.  This card contains stamped elements from "Sentimental Journey" which is only available until the end of August.  The Riding Hood Red ribbon is from a previous collection, but I just had to add this tiny piece to go with the RHR cardstock.  The train schedule is a piece from the Designer Series Paper called newsprint.  It's my newest favorite for everything.  Add some vintage brads and a touch of black.  Voila!
This is one of the prettiest stamp sets.  I love hydrangeas anyway, but this set is so versatile.  Add a couple of little butterflies and some ribbon and it's instant art. 

Tropical Party Birthday Card

Tropical Party stamp set and real sand from our beach!  How cute is this? 

Tuesday, July 13, 2010

What would you do with this???


This past Saturday we had our Ink Flamingos team meeting.  I gave each attendee an assignment based on the color combinations and stamp suggestions on page 5 of the new Idea Book & Catalog.  Each person dipped into the martini glass to pull out her assignment.  Well, there were a few groans and a few giggles, but they met the challenge head-on and created some beautiful projects.  Dottie drew "Traditional Christmas" and used Elements of Style for her first project.  That was too easy for her so she stretched her imagination and reached well outside her comfort zone for the 2nd project using the Vintage combination with Circle Circus.  Wow!  Great job, Dottie! 
Next is Cheryl.  She drew "Sweet Baby" and Animal Stories.  Now, Cheryl is a grandmother and loves to scrapbook, so this was a great choice for her and she proved how creative she is by incorporating some Designer Series Paper and the Square Lattice embossing folder to create a 6x6 scrapbook page.  I know she will put that to good use.     
Julia had a tough one.  Because my daughter wants a bicycle for her birthday, I put together the "Birthday Bash" colors and Pedaling Past from the current mini catalog.  But Julia took the challenge and created a wonderful card full of color, texture and fun.  I really like how she incorporated the cogs from the Cogs XL punch.  Maybe I'll dust off my bike and take a ride.....someday.


   Isn't this card cute?  Angel was thrilled when the stamp set she chose was Tropical Party and the color combo was Build-A-Bear.  So her.  This card actually matched the shirt she was wearing.  The 2nd project was so colorful and creative....just like Angel.   

 Now for our mother-daughter team:  Daphne chose "Vintage" colors of Very Vanilla, Riding Hood Red and Basic Black to use with Artistic Etchings.  I love all of that, but the card she made was stunning. 


Daughter, Melissa inherited her mother's creativity, but has her own sense of style.  I've always liked her style.  Melissa chose "Halloween" and From the Crypt.  Talk about creative!!  Yikes!  So, with no advanced planning on their parts, a limited supply of products and only their own imaginations, my team members proved how they became successful creative coaches and an inspiration to myself and others.  Well done, Ladies.  Well done.

Followers

About Me

My photo
Welcome to my little corner of the world. I've worked in a lot of different industries in my life, mostly sales and management and now I am enjoying just gleaning the most out of life that I can.